Quick answer
To teach music lessons online, use a USB microphone or audio interface, wired headphones, a camera angle that shows the hands, and your video app’s music setting (in Zoom, Original sound for musicians). Plan lessons around call and response, because internet delay makes playing in time together impossible. Then set clear policies for time zones, prepayment and dropped connections.
Key takeaways
- Upgrade one piece at a time, sound first: a USB microphone with a headphone jack and wired headphones, then a camera placed where it shows the hands.
- In Zoom, turn on Original sound for musicians, which turns noise suppression off, and turn off Automatically adjust microphone volume.
- You can’t play in time with a student online: in a Stanford study, tempo held steady only up to about 20 milliseconds of one-way delay, and video calls run higher.
- Daylight saving time changes on different dates in the US and the EU, so for about a week in autumn and two or three weeks in March, New York and Paris are five hours apart, not six.
- Take payment for online lessons in advance; as of November 2026, Stripe’s US pricing adds 1.5% for international cards to its standard 2.9% plus 30 cents.
On this page
- How to start teaching music online, step by step
- How to teach music lessons online: the setup you need
- Which audio settings should you use for online music lessons?
- Which platform is best for online music lessons?
- Why can’t you play together in an online lesson?
- How do you share scores and recordings online?
- How do you handle time zones with online students?
- How should you handle payments and policies for online students?
- How do you find students for online music lessons?
- Questions
Teaching music online starts with your setup: clear sound, a camera that shows the student’s hands, and a video app set up for music instead of speech. Then you change how you teach: you can’t play along with a student over the internet, so lessons run on call and response, recordings and very clear verbal instructions. The business side changes too, with time zones, prepayment and a policy for dropped connections.
How to start teaching music online, step by step
To start teaching music lessons online, in order:
- Fix the sound first: a USB microphone, wired headphones, and the computer plugged into the router by Ethernet if you can.
- Point a camera at the hands, and add a second angle when you can.
- Turn on your video app’s music setting (in Zoom, Original sound for musicians), and ask students to do the same.
- Use one platform and one link that every student can open without help.
- Teach in call and response, because internet delay makes playing together impossible.
- Send the music before the lesson, and ask for recordings made on the student’s own phone.
- Write an online policy for time zones, prepayment and dropped connections.
- Find students through your own website or a lesson marketplace.
Each step is covered below.
How to teach music lessons online: the setup you need
The equipment that matters most is a better microphone than your laptop’s, a pair of wired headphones and a camera you can place where it shows the hands. You can start with what you own and upgrade one piece at a time, sound first.
| Upgrade | What to get | Example and price (as of November 2026) | What it fixes |
|---|---|---|---|
| Start | The laptop, tablet or phone you have, wired earbuds, something to raise the camera to eye level | What you already own | Echo, and a camera angle that looks up your nose |
| Better sound | A USB microphone with a headphone jack | Logitech G Yeti: $139.99 list on Logitech G’s store, on sale for $109.99 when we checked | Fuller, clearer sound than a built-in mic, and you hear yourself with no delay |
| Better picture | A 1080p webcam you can mount anywhere | Logitech C920s Pro HD: $69.99 on Logitech’s store | A sharp picture from an angle that shows your hands |
| Second camera | A second webcam, or a phone on a mount joined to the call as a second device | Logitech Brio 500: $129.99 on Logitech’s store | Face and hands at the same time |
| Studio sound | An audio interface and a microphone that plugs into it | Focusrite Scarlett Solo (4th generation): $169.99 on Focusrite’s store, plus a microphone | The best sound, and an instrument input for guitar or bass |
If you join from a phone as a second camera, mute its microphone and turn its speaker off, or you will hear your own echo.
Plug the computer into your router with an Ethernet cable if it is within reach. Wi-Fi is more likely to stutter when others in the house are online, and in a music lesson a dropout lands in the middle of a phrase.
Light matters more than camera price. Put your main light in front of you, behind the camera, never a bright window behind you. A lamp bounced off a white wall gives softer light than one pointed straight at your face. Light the hands and the instrument as well as your face.
Where should the camera go for each instrument?
Put the camera where you would stand in a lesson to check the thing students most often get wrong. For most instruments that means the hands, not the face.
| Instrument | Main camera | Second camera, if you have one |
|---|---|---|
| Piano | From the side at shoulder height, showing both hands, posture and pedal foot | Overhead, looking down at the keys |
| Guitar, bass, ukulele | From the front, slightly to the fretting-hand side, showing both hands | Close on the fretting hand |
| Violin, viola | From the front-left, showing the bow arm and the left hand | Close on the left hand |
| Cello | From the front at an angle, showing the bow and the left hand | Side view for posture |
| Voice | Front, at eye level, framing the face, shoulders and chest | Side view for posture and breathing |
| Wind and brass | Side view, showing posture and the instrument angle | Close on the face for the embouchure |
| Drums | Wide view from the front and slightly to one side | Over the snare and hi-hat |
Ask students to set their camera the same way as yours, and send a photo of the angle you want before the first lesson.
How to teach piano or guitar online
To teach piano online, use two camera angles if you can: the side view for posture and the pedal foot, and an overhead view of the keys, which shows fingering and hand shape far better than a side view alone. Ask the student to raise their laptop, tablet or phone until it sees both hands, and to turn on their app’s music setting too, because speech processing is what cuts sustained notes and quiet playing. If you play a digital piano, plug it into an audio interface rather than putting a microphone near its speakers.
To teach guitar online, frame both hands from the front, slightly to the fretting-hand side, and add a close view of the fretting hand when you can. Ask the student to tune before the lesson with a clip-on tuner or a tuner app, so lesson time isn’t spent tuning over a delayed connection. An audio interface with an instrument input lets you plug in an electric or acoustic-electric guitar directly. And name every place on the neck as precisely as bars and beats: “third fret, B string, ring finger.”
Which audio settings should you use for online music lessons?
Video apps process sound for speech by default. Zoom, for example, applies noise suppression and echo cancellation unless you change it, and can adjust your microphone volume for you. That processing can cut sustained notes and quiet playing. Turn on each app’s music setting before the lesson, and ask your students to do the same on their end.
| App | Setting for music | Where to find it |
|---|---|---|
| Zoom | Original sound for musicians | Desktop: profile picture, Settings, Audio, Microphone modes. Mobile: profile picture, Settings, Audio |
| Google Meet | Turn off Noise cancellation | In a meeting: More options, Settings, Audio |
| Microsoft Teams | High fidelity music mode | In a meeting: the arrow next to Mic, More audio settings |
| FaceTime | Mic Mode: Wide Spectrum | During the call on iPhone or iPad: Control Center, then the app controls |
What each one does, from the companies’ own help pages:
- Zoom. For Zoom music lessons, this is the one setting that matters most. Zoom’s settings article says Original sound for musicians “improves audio quality for music by capturing a fuller range of sound,” and that noise suppression is turned off in this mode. The same Audio tab has Automatically adjust microphone volume. Turn it off and set your input level by hand so dynamics stay as you play them.
- Google Meet. Google says Meet cancels non-speech noise and advises turning off noise cancellation when you need other sounds, like music. Noise cancellation is only on some Google Workspace and Google One plans, so you may not see the switch at all.
- Microsoft Teams. Microsoft says high fidelity music mode uses a 32 kHz sampling rate at 128 kbps when bandwidth allows. It recommends high-quality external audio devices, turning off noise suppression and echo cancellation, and not using Bluetooth devices.
- FaceTime. Apple describes Wide Spectrum as leaving ambient noises unfiltered. It works in FaceTime calls and some other apps, but not in ordinary phone calls.
Wear wired headphones, and ask students to wear them too. Without headphones, the sound from your speakers feeds back into your microphone as echo, and with the music settings on, the app filters less of it out.
Which platform is best for online music lessons?
The best platform is the one your students can open without help and that has a music setting. Zoom, Google Meet, Microsoft Teams and FaceTime all qualify, so choose what your students already use. FaceTime suits families on iPhones, iPads and Macs.
Use one link for all your lessons, so nobody hunts through emails five minutes before the lesson starts. In Sonely, you save your Zoom, Google Meet, Teams or other meeting link on your profile once, and every online lesson carries it. Families find it on the lesson in the family portal, and in reminders whose template includes the lesson’s location. You can also choose FaceTime as the location, and each student’s FaceTime ID becomes the link. If a substitute teaches, students get the substitute’s link. Sonely keeps the right link on every lesson. If you use Lessonspace or Pencil Spaces instead, add your API key to a location and each lesson there opens its own online lesson room. See Sonely for online teachers.
Why can’t you play together in an online lesson?
You can’t play in time with a student online because sound takes too long to travel between you. Even a small delay makes two players wait for each other, and the tempo drags.
A Stanford study by Chris Chafe, Juan-Pablo Cáceres and Michael Gurevich measured this with pairs of people clapping a rhythm together over headphones from separate rooms. Their tempo stayed stable with up to about 20 milliseconds of one-way delay, and beyond that it slowed down markedly. For comparison, the authors note that sound takes about 9 milliseconds to cross a string quartet.
Video calls don’t get under that limit. Even Zoom’s Live performance audio, a desktop setting designed for musicians playing together, “aims to reduce the audio latency between all participants to ~30-50 ms,” which is still above the range where the study found tempo held steady.
So plan lessons that never need you to play at the same moment:
- Call and response. You play a phrase, the student plays it back. This works for rhythm, technique and new passages.
- The student keeps the time. Ask the student to run their own metronome or backing track at their end. You listen, but you don’t try to join in.
- Recorded accompaniments. Record your part of a duet or an accompaniment and send it. The student plays along with it at home, or in the lesson from their own device.
- Count out loud from one side only. If you count in, stop counting once the student starts.
- Give clear instructions. You can’t point at the page, so name the place: “bar 12, beat 3, left hand.”
How do you share scores and recordings online?
Send the music before the lesson, so the student has it in front of them, and both of you use measure numbers to find your place. During the lesson, share your screen to show a page or mark it up.
How do you play music on Zoom so the student hears it?
Share the sound through Zoom instead of holding a speaker to your microphone. On a Windows or Mac computer, click Share in the meeting toolbar, choose the screen or window, and select Share sound under Share options: Zoom says that “any sound played by your computer will be shared in the meeting.” The arrow next to it switches between mono and stereo (high fidelity) audio. To send a backing track without showing your screen, click Share, open the Advanced tab and choose Computer audio, which shares only your computer’s audio. Optimize for video sharing is only for showing a video clip full screen; Zoom says not to turn it on otherwise, because it can blur the shared screen.
The best sound you will ever hear from an online student is a recording they make on their own phone and send to you, because it never passes through the video call. Ask students to record a take of the week’s piece before each lesson. You hear the real sound and use the lesson to work on what you heard. If you want to record lessons yourself, ask families first and say in your policy where recordings are kept and for how long.
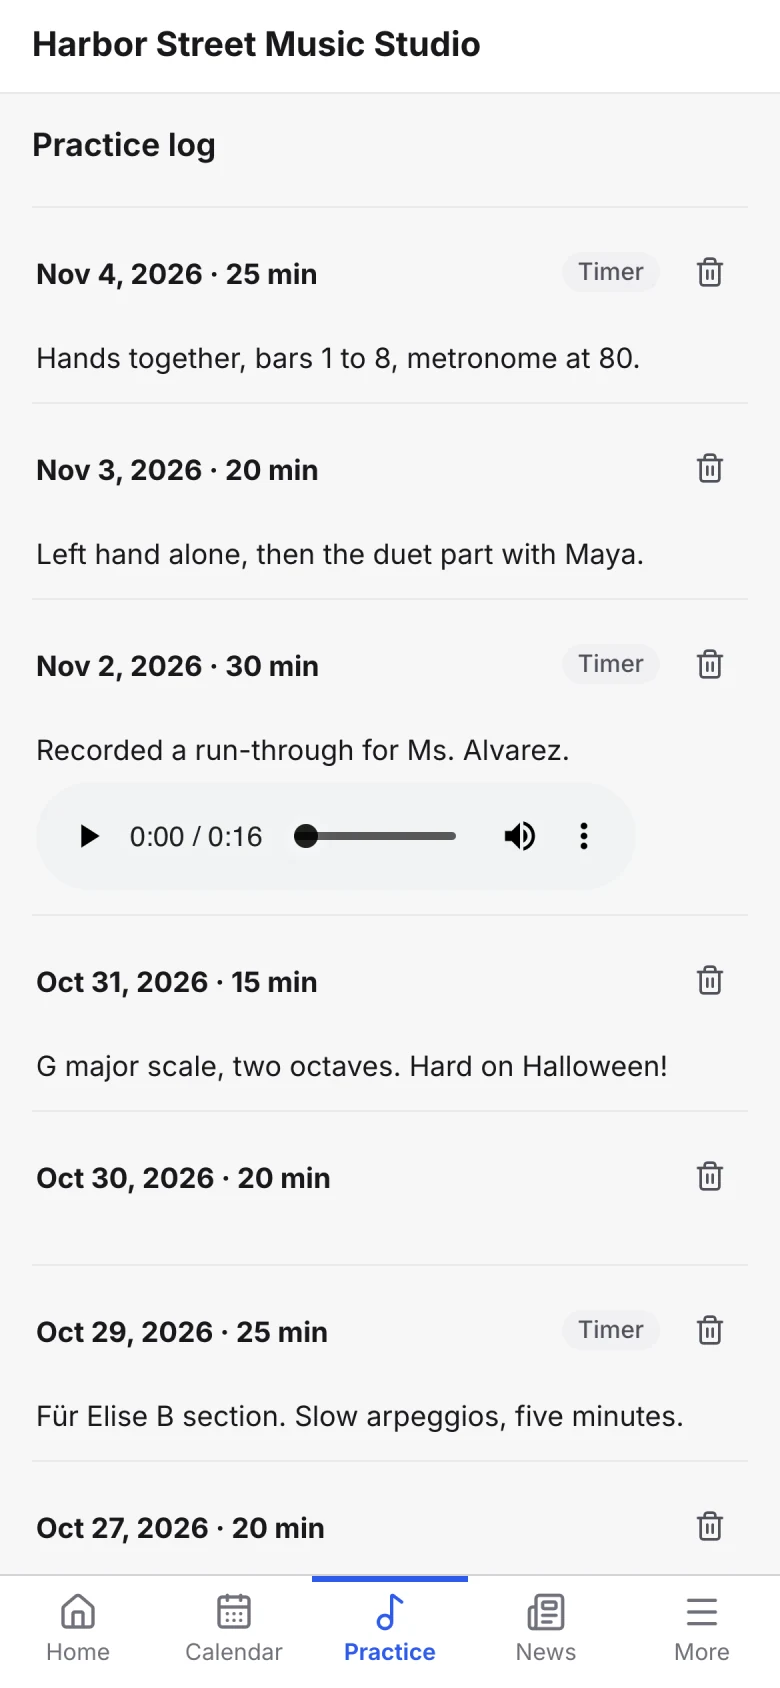
In Sonely, you put sheet music, practice tracks and videos in your online resources and choose which students or group tags can open them from the family portal. Students log practice with a timer and attach recordings for you to hear before the next lesson. See online resources and practice tracking.
How do you handle time zones with online students?
Agree every lesson time in the student’s time zone as well as yours, and write both in the confirmation. Then watch out for daylight saving time, which doesn’t change on the same date everywhere.
In the United States, NIST says daylight saving time begins on the second Sunday of March and ends on the first Sunday of November, and Hawaii and most of Arizona don’t observe it. In the European Union, the European Commission says clocks change on the last Sunday of March and the last Sunday of October. So for two or three weeks in March and about a week around the start of November, the gap between a teacher in New York and a student in Paris is five hours instead of six. Remind affected families in the weeks before each change.
Sonely can show each family their lessons in their own time zone. Turn on multiple time zones, and each teacher, parent and adult student can choose their own; the portal calendar and reminders show their time, while invoices stay in your studio’s.
How should you handle payments and policies for online students?
Take payment for online lessons in advance, by card or bank, and put your online rules in writing before the first lesson. Online students can live anywhere, so paying in person isn’t an option, and a family who stops showing up is harder to chase.
International students cost more to accept. As of November 2026, Stripe’s US pricing adds 1.5% for international cards and another 1% if currency conversion is required, on top of its standard 2.9% plus 30 cents for domestic cards. Check your own processor’s pricing page and decide whether to absorb the fee or pass it on.
In Sonely, families pay through your own Stripe or PayPal account, Sonely takes no cut, and you can add a convenience fee to card or bank payments if you want families to cover processing costs. Invoices can go out every week or month, and families on auto-pay are charged when the invoice is sent. See invoices and payments.
Add an online section to your studio policy, like the one below. Our music studio policy template covers the rest, and our guide to billing music lessons explains monthly tuition versus pay per lesson.
ONLINE LESSONS

1. Lessons take place on [Zoom / Google Meet / FaceTime] using the
   link in your family portal and reminders. Please join 2 minutes
   early with your instrument tuned and music open.

2. Lesson times are set in [studio time zone]. Your portal shows
   them in your own time zone. Please check the time in the weeks
   around daylight saving changes.

3. Please use wired headphones and turn on the app’s music setting
   ([Original sound for musicians in Zoom]).

4. Tuition is paid in advance by card or bank through the family
   portal.

5. If the connection fails on my side, I will make up the lost time
   or credit it. If it fails on your side, we will try to reconnect
   for [10] minutes, then switch to [a phone call]. Time lost to a
   connection problem on your side is not made up.

6. If you join late, the lesson still ends at its scheduled time.

7. I do not record lessons without your permission. If we agree to
   record, recordings are kept for [period] and shared only with you.
How do you find students for online music lessons?
Online students come from two places: your own studio, where families find you and pay you directly, or a lesson marketplace, which brings students in exchange for a share of each lesson. You can use both: a marketplace while your own referrals build, and your own studio for the families who stay.
| Route | How students find you | What you keep | Best for |
|---|---|---|---|
| Your own online studio | Your website, search, social media, referrals, local families who prefer online | Everything, less card processing (for example 2.9% plus 30 cents for a US card on Stripe) | Teachers who want to set their own prices and policies |
| Outschool | A marketplace of live online classes for children | 70% of the class price, as of November 2026 | Group classes for kids, not weekly private lessons |
| Lessonface and other lesson marketplaces | A teacher profile on the marketplace | The lesson rate, less the platform’s fee (check its current fee page) | Filling a schedule while your own referrals build |
On your own, you need three things a marketplace would otherwise provide: a page that explains what you teach and how online lessons work, a way to book a trial lesson, and a way to pay. In Sonely, families book from your weekly availability, a trial lesson can be free or paid at booking, and the studio website and sign-up forms are part of the free plan for one teacher. See sign-ups and online booking. For the rest of the job, how to start a music studio covers rates and setup, and how to get more music students covers marketing.